I still remember my first trip into the Play Console. I had a working app, a signed bundle and a lot of confidence, and then I hit a wall of forms I had never heard of. Data safety, target audience, content rating, app access. None of it was hard, but nobody had told me the order, and a couple of choices can never be undone.
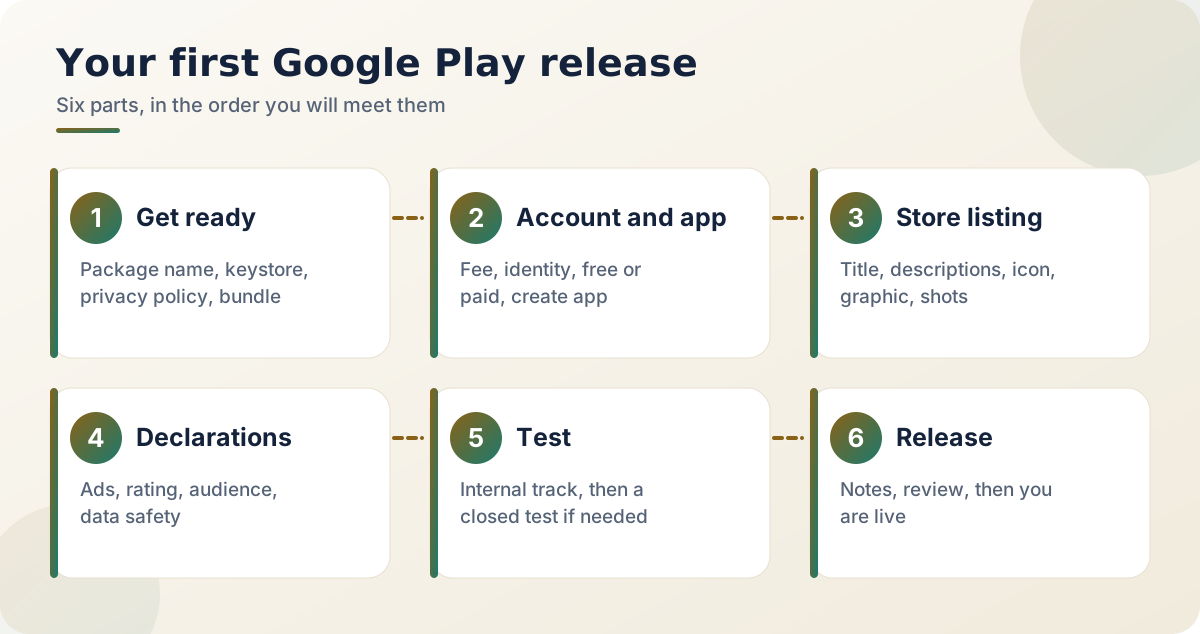
This guide is the walkthrough I wish I'd had. It covers everything from the day before you open the Console to the day your app goes live, in the order you'll meet it, with the small details the official help pages tend to skip.
Part 1: Get ready before you open the Console
An evening of preparation saves you a week of waiting later. Do these four things first.
- Choose your package name now. Something like com.yourname.appname. After release you cannot rename it, and every update must carry the same one. Pick something you will still be happy with in five years.
- Back up your keystore. Create an upload key, then store the file and its password in two separate places, for example a USB drive and a password manager. People laugh at this advice right up to the day they need it.
- Write a privacy policy and put it on a normal web page. Even an app that collects nothing needs one. A page that says "this app does not collect personal data" is perfectly fine, but Google wants the link, and it must open for everyone without a login.
- Build an Android App Bundle. In Android Studio choose Build, then Generate Signed Bundle. Play uses the bundle to create the smaller APKs that each phone actually downloads.
Part 2: Create the developer account and the app
- Register the account. You pay a one-time fee (25 US dollars when I last checked) and verify your identity. Use an email address you will keep for years, because policy notices go there and a missed notice is the most common way people lose an app.
- Choose personal or organization. An organization account usually needs a D-U-N-S number, which can take a while to arrive. A personal account opens faster, but newer personal accounts have extra testing steps before the first production release.
- Select "Create app". Fill in the name, the default language, whether it is an app or a game, and whether it is free or paid.
- Decide free or paid with care. A free app can never become a paid one. If you might sell something later, plan on in-app purchases or a subscription instead.
Part 3: Make the store listing work for you
This is the page people see, so write it the way you would explain the app to a friend. Search matters too, so put the main idea early.
| Item | What Play expects | A practical tip |
|---|---|---|
| App name | Up to 30 characters | Say what the app does, not only a brand word |
| Short description | Up to 80 characters | This is the line shown before "read more" |
| Full description | Up to 4,000 characters | Lead with the benefit, then the features |
| Icon | 512 by 512 pixels, PNG | Keep it simple, it is tiny on a phone |
| Feature graphic | 1024 by 500 pixels | Keep important text away from the edges |
| Screenshots | At least two for phones | Add a short caption to each one |
Avoid words like "best", "number one" or "free download" in the title. They are a common reason for a metadata rejection, and they read as shouty anyway.
Part 4: The declarations everyone forgets
Open "App content" in the Console and you will find a list of tasks. Every one must be completed before you can release.
- Privacy policy. Paste the link to your page.
- Ads. Say honestly whether the app contains ads.
- App access. If part of the app sits behind a login, give reviewers a working test account.
- Content rating. A short questionnaire. Answer for what the app really contains, not what you hope it will be rated.
- Target audience. If you tick children, a stricter rule set applies. Only do it if the app is truly made for them.
- Data safety. List what data you collect, share and how it is protected. Be careful here: ad SDKs and services like Firebase collect data too, and you must declare it.
Part 5: Test before the real release
You upload your bundle to a testing track first. There are four: internal, closed, open and production.
- Start with internal testing. It is nearly instant, and it lets you install the real build from the Play Store on your own phone. That catches problems a debug build never shows, such as a signing issue or a permission that behaves differently.
- Run a closed test if your account requires it. Newer personal accounts must test with a minimum number of people for a minimum number of days before applying for production. Those numbers have changed before, so read the current ones inside the Console and do not trust any blog post, including this one.
- Find testers early. Friends, classmates and colleagues all count. Finding the people is the slow part, not building the app.
- Test on an old phone. One cheap, slow device will show you problems your own phone never does.
Part 6: Release and wait
Choose production, add short release notes and send it for review. The first review can take a few hours or several days, and updates are usually quicker. If the status simply says "in review" for a while, relax. If an email arrives, read it carefully, because it means something needs your attention and the message is usually specific.
The mistakes I see most often
Apps are rarely rejected for anything dramatic. The usual causes are small:
- A privacy policy that does not match what the app really does.
- Permissions the app never uses, like contacts or location.
- Screenshots from an old version, or from a different app entirely.
- A crash on first launch on a device the developer never tried.
- Ignoring the target API requirement. Google expects new apps and updates to aim at a fairly recent Android version, so check the current level before you build, not after you are rejected.
After you go live
If you show AdMob ads, add an app-ads.txt file to your developer website. Our guide to earning from AdMob without risking your account explains how. Reply to early reviews politely, even the grumpy ones. And set a reminder to review your Data safety form whenever you add a new SDK. These small habits keep an account healthy for years.
Frequently asked questions
Do I need a company to publish an app?
No. A personal developer account is enough for most first apps. An organization account is useful if you want the company name shown, and it usually requires a D-U-N-S number.
Can I change the app name later?
Yes, the store listing name can be edited. The package name cannot.
How long does the first review take?
It varies from a few hours to several days. Plan for a few days so you are not stressed, and treat anything faster as a bonus.
Why was my update rejected even though nothing changed?
Policies change over time. An app that passed last year can fail today if it no longer meets a newer requirement, such as the target API level or a new declaration. Read the rejection email carefully, it tells you which policy applies.
Should I upload an APK instead of an AAB?
For new apps Play requires an Android App Bundle. APK files are still useful for testing on your own devices.
Useful resources
- Google Play Console Help for the official step-by-step pages and policy updates
- Android App Bundle guide on developer.android.com
- Developer Program Policy for the rules every app must follow
If there is one thing to take from all this, it is that the Console is just a checklist. Go through it slowly, once, in order, and publishing stops feeling scary.
Related reading
- What every Android app privacy policy must include: writing the privacy policy page Google asks for
- How to convert an AAB to an installable APK on your phone: testing a bundle on your own phone
- SEO for a new website: what actually matters in the first 90 days: getting your developer website found